Archive for the 'CSS' Category

Highlighting WordPress posts

Sunday, November 11th, 2012

A trick I just discovered while trying to spice up CSS Viking is to use a category as a flag for highlighting an article. This is very easy because every article gets category-categoryname, tag-tagname etc. as classnames on its’ article element. This is theme-dependent but it works in the current default theme (WordPress 2012), Blaskan and probably most other modern themes.

I don’t display categories on CSS Viking (just tags) so I made a category named highlight that will be used for highlighting posts. Since it is not displayed the only effect is that articles are given the class category-highlight.

There are endless possibilities to visually highlight an article, but the currently used code for this is the following:


/* Highlighted articles on frontpage */
body.home article.category-highlight {
background-color: #FFFFFF;
color: #000000;
}
body.home article.category-highlight * {
color: #000000;
}
body.home article.category-highlight footer {
background-color: #0088FF;
color: #FFFFFF;
}
body.home article.category-highlight footer * {
color: #FFFFFF;
}
body.home article.category-highlight:hover {
background-color: #FFFFFF;
color: #000000;
}

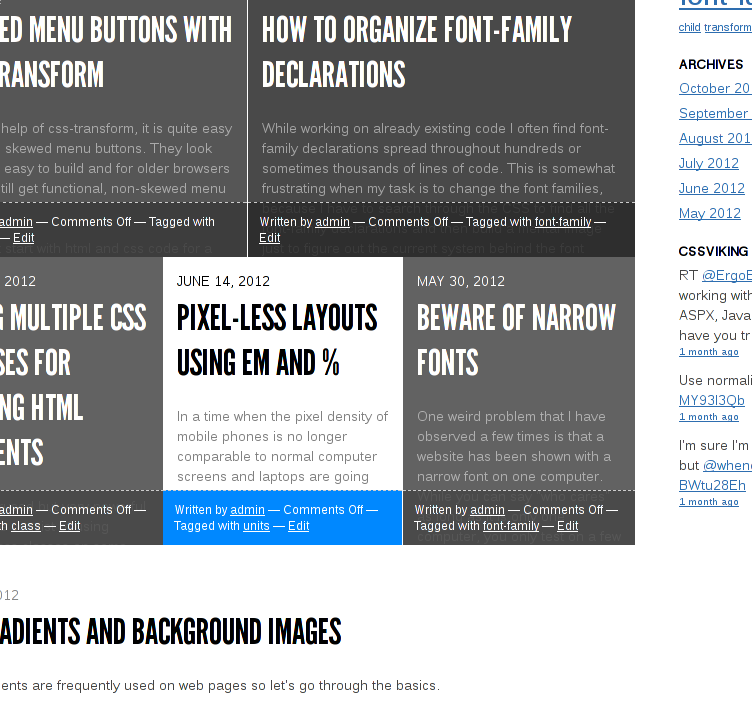
And it looks like this at the monent (the white/blue one is the higlighted):
A part of the CSS Viking frontpage with a highlighted article

The current code higlights an article only on the frontpage but the class category-highlight is applied to the article in most other views too so it can be highlighted wherever it is displayed. If you don’t want to use a category for this, consider using a tag (and make sure tags are not displayed in your theme) or install a plugin that provides something usable for this. I’m sure they exist but a two-minute search didn’t uncover any of them.

A simpler way to right-align a block-level element

Saturday, December 3rd, 2011

The standard way to right-align a block-level element is to float it. It works well and is simple if you don’t mind that the following content creeps up beside your element. If you want that, fine. If not, you need to add a clearfix hack or make sure that the following content content clears your element.

A different and simple way to achieve the right-alignment that also makes sure that following content doesn’t creep up can be achieved with some margin-trickery.

As a start, we take a look at the html and css that is used to center a block-level element within its parent:
<div class="parent">
<div class="block">
</div>
<p>Some other content</p>
</div>

.parent {
border: 1px solid black;
width: 500px;
}
.block {
background-color: blue;
margin-left: auto;
margin-right: auto;
height: 100px;
width: 250px;
}

background-color, height and border are only included to visualize the elements.

What we want to achieve is simply done by setting the right margin to zero:
.block {
background-color: blue;
margin-left: auto;
margin-right: 0;
height: 100px;
width: 250px;
}

This also has the added benefit of introducing less side effects for older versions of Internet Explorer than the use of floating. Handy if you or your clients care about that.

View sample page

How to fix CSS problems in Internet Explorer

Sunday, February 24th, 2008

Internet Explorer is a major source of frustration for web developers because
of its incomplete and buggy CSS support. Luckily, there are quite simple fixes
for many of the problems.

The solutions

By adding css rules that logically should not have any effect (and will have no effect in sane web
browsers) you can make IE behave like it should. The following rules are my common tricks for doing this.


line-height: 1.25;
zoom: 1;
position: relative;

In addition, there are 2 more tricks that might help:

  • Invisible bottom border for bleeding background images.
  • Putting absolutely positioned elements inside relatively positioned elements at the bottom of the relatively positioned element.

Examples and explanations

The line-height trick is used when the content in a floated element does not appear before you scroll it off screen and back. Which value you specify for line-height does not matter, 1.25 is just what I think is the closest to browser default values. This is a typical error for IE6 and does not happen that often in IE7.

For things like disappearing background images and incorrectly (absolutely) positioned elements, the position: relative and zoom: 1 combo often solves the problem.
You don’t always need both of them. Try them one by one and then in combination if you don’t see any effect. Note: zoom is a proprietary property that is implemented in IE only so it will invalidate your stylesheet.

Sometimes, a vertically repeated background image bleeds out of its element. This can be stopped by adding a bottom border on the element. You can use the background color of the containting element as border color so the extra border won’t be visible. This problem might also be solved with the zoom trick.

A more complicated problem sometimes happen when you have absolutely positioned elements inside a relatively positioned element. The absolutely positioned elements will then not appear no matter which of the above mentioned tricks you apply. You must then edit your html code and place your absolutely positioned elements at the bottom of your relatively positioned element (just before the closing tag). I don’t remember having this problem on anything but absolutely positioned images but you might have other experiences.

Using Opera’s web search capabilities for easy validation

Tuesday, July 31st, 2007

Opera has a quite nice feature that allows you to add arbitrary search engines to its’ builtin selection of search engines, available from a dedicated search field or from the address field with special keywords. By using this feature you can also add easy access to online validators for HTML, CSS and RSS/Atom feeds.

Adding a search engine

All you have to do to add a new search engine is to right click in that engines’ search field and select Create search from the context menu. You can now modify the name for that search and add a keyword you can use to access the new search from the address field.

By default, by typing g foo in the address field, you use Google to search for foo. y foo does the same, but with Yahoo instead of Google.

Adding validators

Since Opera just stores data for the search form and submits an appropriate GET/POST request this is not really limited to searching. You can use the same technique to submit any form.

Just right click in the url field for a validator of some sort, f.ex. the Feed Validator and create search. If you enter feed in the keyword field you can type/paste f.ex. feed http://www.xhbml.com/feed/ into the address field in your Opera and you will instantly validate the RSS feed for this website.

Opera will also store other data for the form so you can store a customized validation for W3’s html validator that might suit you better than the one that is available from Opera’s context menu. By doing the same for W3’s CSS validator you can have RSS/Atom, HTML and CSS validation instantly available from the address field.

Examples

You can type/paste any of the following (without the list marker) into your address field to try it out after completing the instructions above.

  • html http://www.xhbml.com
  • css http://www.xhbml.com
  • css http://www.xhbml.com/wp-content/themes/default/style.css
  • feed http://www.xhbml.com/feed/

Using lists for menus

Saturday, December 18th, 2004

A menu is a list of the main pages on a website so why shouldn’t you use html lists for building them? Two common reasons for not doing so are

  1. I don’t want those dots in front of the links
  2. There is so much whitespace that they are useless for menus

But those problems disappear as soon as you apply a little CSS to them.

Let’s just mention some reasons to use lists

  1. Html list tags are short
  2. A menu is a list
  3. Other types of user agents (text browsers, cellphones etc.) will better understand how to represent your menu because list tags carry meaning, divs and tables does not.

Ok, now it’s time to start with the html for a simple menu. We will use an unordered list (specified with <ul>) because you don’t have to read the pages in the specified order.

<ul id="menu">
<li>Widgets</li>
<li>Gadgets</li>
<li>Subjects</li>
</ul>

To avoid the problems mentioned above we have to apply a little css to our menu. To remove the list markers (dots) we will apply list-style-type: none; to the ul. To avoid excessive whitespace we must specify margin and padding on both the list and all the list items within it. A border is not really necessary but I want one to make the menu more visible on this page.

#menu{
list-style-type: none;
padding: 0px;
margin: 10px;
width: 120px;
border: 1px solid #FF5C00;
}
#menu li{
padding: 0px;
margin: 3px 5px;
}

That is a margin of 3px above and below each list item and 5px to the left and right:

  • Widgets
  • Gadgets
  • Subjects

Now, that looks more like a menu! (If it had links)
But if I want a horizontal menu? Just one and a half change. List items are normally rendered as block level elements which implies that each list item should be placed below the previous but this can be changed with display:inline; in the CSS code for the list items. If you are unfamiliar with the different display types available you should read about the CSS display property at W3schools

The width of the whole list must also be changed to make room for the horizontal orientation.

#menu{
list-style-type: none;
padding: 0px;
margin: 10px;
width: 300px;
border: 1px solid #FF5C00;
}
#menu li{
display: inline;
padding: 0px;
margin: 3px 5px;
}

And the result :

  • Widgets
  • Gadgets
  • Subjects

Just one note for those who need fine control over the spacing of the menu items; Some browsers apply extra whitespace between these list items if there is whitespace between the </li> and <li> tags

That’s the basics of using lists for menus. As you see, the html code is very, very short and you are encouraged to use CSS for creating the visual appearance. The menu might look boring now, so head over to the Listamatic and fix that.